Peanut Butter and Chocolate Cheesecake in a Glass

DSC02735

Click below for the accompanying YouTube Tutorial

Tutorial Video on how to Make This Cheesecake

Ingredients:

  • 1/3 cup mix nuts/ unsalted peanuts (your choice)
  • 1/2 cup Caster Sugar
  • 1/4 cup Water
  • 1/4 cup Thickened Cream Whipped
  • 110 g Dark Chocolate
  • 250 g Cream Cheese
  • 1/3 cup brown sugar
  • 1 tsp Gelatine dissolved in 1/4 cup boiling water
  • 1/3 cup Peanut Butter
  • 1/2 cup Thickened Cream, extra

DSC02738

Instructions:

  1. Roughly chop and spread peanuts onto a tray lined with baking paper
  2. In a saucepan combine sugar and water over a medium heat. Stir occasionally until the sugar dissolves.  Leave to simmer until golden.

DSC02726

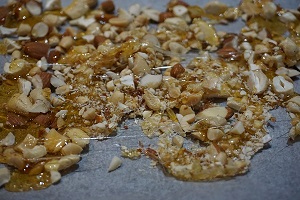
  1. Remove from heat and pour over the peanuts. Allow to cool and harden
  2. Set up a bain marine and combine the chocolate and cream. Stir until smooth and combined. Take off heat and allow to cool
  3. Beat the cream cheese and brown sugar until smooth and creamy.
  4. Add the gelatine and peanut butter. Again beat until smooth and creamy
  5. Gently fold in whipped cream
  6. Break up the peanut brittle and add half into a food processor and crush until fine crumbs form.
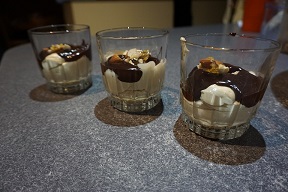
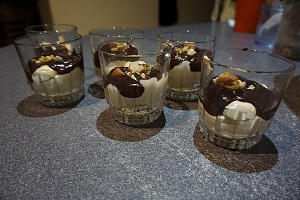
  7. Add this brittle into the bottom of 6 glasses.
  8. Pipe the cheesecake mix evenly into the 6 glasses.
  9. Add the chocolate sauce on top and decorate with the left over peanut brittle.

ENJOY!!!!!

Drawing (1)

Continue reading

Bindi’s Chocolate Mousse Cake

It’s recipe time!

Chocolate plus mousse plus cake!! Has anyone else heard such amazing words than these???

This delicious cake is layers of chocolate goodness. The outside of the cake is covered in luscious creamy chocolate mousse while the inside consists of light chocolate cake layers and the same chocolate mousse. It’s like a match made in heaven!!

The recipe is also quick and easy! It’s fool proof! And with Valentine’s Day so close there’s not better excuse than to make this cake for your special loved one.

Clink the link to check out the video tutorial for this delicious recipe

Bindi’s Chocolate Mousse Cake 

Ingredients:

Cake:

  • 125g butter (softened or at room temp)
  • 1 1/2 cup brown sugar
  • 2 eggs
  • 1/2 cup milk
  • 1/2 sour cream or greek yoghurt
  • 1 tsp vanilla extract
  • 2 cups heaped plain flour
  • 1/2 cup cocoa powder (sifted)
  • 1 tsp instant coffee granules
  • 1 tbsp white wine vinegar
  • 1 tsp baking soda

Mousse

  • 200g dark chocolate
  • 2 tbsp brown sugar
  • 1 1/2 tsp vanilla extract
  • 2 cups heavy cream for whipping

Decorating

  • Freshly popped popcorn
  • Dark Choc Chips

Instructions:

  1. Preheat oven to 185 degree and line the base and sides of an 8 inch cake tin with baking parchment paper.
  2. In a standard mixing bowl with the paddle attachment cream together the butter and sugar until light and fluffy.
  3. Add the eggs, milk, sour cream and vanilla extract. Mixing together after each addition.
  4. Slowly add the flour, cocoa powder and coffee granules. Mixing to combine
  5. In a small separate bowl combine the white wine vinegar and baking soda (this will bubble/ fizz). Add this to the cake mix.
  6. Mix to combine
  7. Bake for 25-30 minutes.
  8. To make the chocolate mousse, melt the chocolate and sugar together (I did mine over a Bain Marie)
  9. Add the cream and vanilla extract. Stir to combine until smooth then remove from the heat and set aside to cool
  10. Whip the cream until stiff peaks form and then add the chocolate mix.
  11. Gently stir to combine.

Assemble the cake:

  1. Once the cake has completely cool cut into thirds (it’s a layered cake so cut  horizontal)
  2. Place the bottom layer straight onto the base you’ll be serving the cake on.
  3. Generously spread the mousse across the first layer of the cake.
  4. Place the middle layer of the cake on top of the mousse and again generously spread another layer of mousse on top of the cake.
  5. Place the top of the cake onto the assembled cake and completely cover with remaining chocolate mousse.
  6. Decorate your cake however you like- I used popcorn and choc chips. Chocolate shavings might also work well.
  7. Place in fridge and allow to set for an hour.

ENJOY!!

Drawing (1)

Continue reading

Double Choc Chip Cookies

Hello everyone and welcome back to my blog/ recipe page!

I know it has been a while since my last post and I apologise for that however, to make up for my lapse in time I had made these delicious Double Choc Chip Cookies!

These cookies are quick, simple, easy and great for that sweet little treat inbetween meals- but don’t eat to many!dsc02184

Happy Baking!

dsc02178

Ingredients:

  • 170g butter, room temperature
  • 1 cup Brown sugar
  • 1/2 cup Caster Sugar
  • 1 Egg and 1 Egg Yolk
  • 1 tbsp Vanilla Extract
  • 1 tsp Instant espresso powder
  • 1 tsp Bicarb soda
  • 2 tsp Corn flour
  • 1/2 tsp Salt
  • 2 cups Flour
  • 3/4 cup Dark Choc Chips
  • 1/2 cup White Choc Chips

Instructions:

  1. In a standard mixing bowl with paddle attachment cream together the butter, brown sugar and caster sugar.
  2. Add in the vanilla extract, espresso, egg and egg yolk.
  3. In a separate bowl combine the bicarb, corn flour, salt and flour. Slowly add this to the wet mixture
  4. Combine until  a soft dough forms.
  5. Fold in choc chips.
  6. Cover and refrigerate for 2 hours (anywhere between 2 hours to overnight)
  7. Preheat oven to 180 degrees and line 2 baking trays with baking paper.
  8. Using your hands, or a tablespoon, make balls from the dough and place evenly on the two trays leaving 2 inches between each cookie.
  9.  Bake for 9-12 minutes.

This recipe will make approximately 24 cookies depending on how big your cookie balls are. Remember- the bigger the balls the more room you need to leave inbetween each cookie.

Drawing (1)

Continue reading

Lemon Butter Cookies

So a couple of weeks ago I made these delicious gooey cookies!

As we all know lemons are in season and instead of making the traditional lemon meringue I decided to think outside the box and make some lemon cookies.

I didn’t want just any lemon cookies though. I wanted something gooey, sweet and delicious- a cookie that would tastes like a lemon slice almost.

The recipe that I am sharing with you below is exactly that! A cookie that tastes like a lemon slice! It takes roughly the same amount of time to make as a lemon slice but they’re super easy to make! And an easier alternative to take to school/ work and also to those who don’t like coconut- which is traditionally found in lemon slices.

Enjoy baking!

IMG_6248

Ingredients:

  • 2 1/4 cups Plain Flour
  • 2 tsp Baking Powder
  • 1 packet (225g) Cream Cheese, room temperature
  • 1/2 cup (113g) Unsalted Butter, room temperature
  • 1 1/2 cups Caster Sugar
  • 2 tbs grated Lemon Zest (approx 2 large lemons)
  • 1 1/2 tsp freshly squeezed Lemon Juice
  • 1 tsp Vanilla Extract
  • 1/8 tsp yellow food colouring- gel based (I used Americolour) this is optional
  • 1 tsp salt
  • 1 Egg
  • 1 Egg Yolk
  • 1 cup Icing sugar- ideally confectioners’ sugar.

Instructions:

  1. Preheat oven to 165 degrees Fan Forced and line 3 baking trays with baking paper
  2. In a standard mixing bowl, combine flour and baking powder. Set aside
  3. In another standard mixing bowl with paddle attachment, combine cream cheese and butter
  4. Mix together until smooth and creamy
  5. Add the sugar, lemon zest, lemon juice, vanilla extract, food colouring and salt.
  6. Mix together until light and fluffy
  7. Add egg and egg yolk
  8. Mix until combine. Increase speed to medium and mix for another 2 minutes.
  9. Reduce speed to low and gradually add flour mixture
  10. Scrap down the sides of the bowl when necessary- the mixture will be very sticky.
  11. Cover bowl and refrigerate for a least 1 hour. ** mixture can remain in fridge overnight if necessary. Having a cold mixture enables it to be rolled into small balls for baking
  12. Place confectioners sugar in small bowl and put it next to the bowl of cookie mixture.
  13. Make 1 inch sized balls of dough **I used a tablespoon for sizing my mixture evenly.
  14. Roll the balls in the confectioners sugar-completely covering the dough
  15. Place on the prepared trays at least 2 inches apart
  16. Bake for 11-14 minutes or until the cookies have cracked. **If the cookies start to brown on the top then they have been overcooked and might be dry.

The cookies taste best when they are at room temperature or straight from the fridge.

I hope you enjoy these cookies as much as I did!!

IMG_6252

Drawing (1)

Continue reading

Mini Brownie Butter Cakes

Trying out a new recipe following on from the Mini Matcha Cheesecakes I created earlier this year.

I love making Mini Cakes- not just because they look great- but because when it comes to eating them you’ve got your own little bite sized portion which is easier to eat, hold and in general a lot cleaner than cutting off a slice of cake.

– And when I say they look great I mean it. Look at my amazing cakes (not to self gloat) but they look great. Couldn’t be happier on how they turned out

Video Tutorial can be found at Mini Brownie Butter Cakes How to Tutorial (click the link)

DSC01996

Ingredients:

Brownie

  • 140 g Dark Chocolate
  • 50 g Butter
  • 1/4 cup Brown Sugar
  • 1/4 cup Plain Flour

Butter Cake

  • 120 g Butter
  • 100 g or 1/2 cup sugar
  • 2 Eggs
  • 1 cup Plain Flour
  • 1/2 tsp Baking Powder
  • 3 1/2 tbls Milk

DSC02014

Instructions:

Brownie

  1. Preheat Oven to 170 degrees Fan Forced and lightly grease a muffin pan
  2. Melt the Chocolate and Butter over a Bain Marie
  3. Remove from heat, cool slightly and then add the brown sugar
  4. Mix to combine
  5. Add egg and mix straight away ensuring that the heat from the chocolate doesn’t cook then egg.
  6. Fold in the flour until combined
  7. Using a spoon add the brownie mixture into the bottom of all the muffin pans.
  8. Bake for 5 minutes

Butter Cake

  1. Increase the temperature of the oven to 180 degrees
  2. In a standard mixing bowl with a paddle attachment, cream together the butter and the sugar until light and fluffy
  3. Add eggs, one at a time, mixing after each addition
  4. Combine the sifted flower and baking powder in a separate bowl.
  5. Alternating between the flower mixture and the milk, add this to the butter mixture. Folding into the mixture- do not over beat
  6. Add a tsp of butter batter mixture on top of the brownies
  7. Bake for 15 minutes

DSC02009

Drawing (1)

Continue reading

Zucchini, Banana and Choc Chip Muffins

Another healthy recipe to my collection I’m sharing with you my Zucchini, Banana and Choc Chip Muffin recipe!

DSC01977

Depending on what substitutes you use, these muffins only have 154 calories per muffin and 4 grams of protein! Great for breakfast or a snack.

Furthermore they’re quick, easy and cheap for those on a tight budget

DSC01958

Ingredients:

  • 2 medium size ripe Bananas-mashed
  • 1 tsp Vegetable oil (healthier alternative use coconut oil)
  • 1/4 cup Honey
  • 1 tsp Vanilla essence
  • 2 Egg whites
  • 1 cup grated Zucchini- 1 medium size
  • 2 tbs applesauce
  • 1/3 cup Greek Yoghurt or Sour Cream
  • 1 1/2 cups Whole Wheat Pastry Flour
  • 1 1/4 tsp Baking Powder
  • 1/2 tsp Bicarb Soda
  • 1 1/2 tsp Ground Cinnamon
  • 1/2 cup Choc Chips

Instructions

  1. Preheat oven to 175 degrees and line a 12 cup muffin tin with liners. Spray inside the liners with non stick cooking spray
  2. In a standard mixing bowl with whisk attachment, combine mashed bananas, oil honey, vanilla and eggs.
  3. Mix until smooth
  4. While waiting for mixture, grate Zucchini and drain excess water by squeezing in hands over sink.
  5. Add zucchini, applesauce and yoghurt to banana batter and mix until just combined
  6. I made my own apple sauce. To do this I peeled 2 apples, sliced them into cubes and microwaved until soft. I then used a fork to mash them up- the same way I mashed the bananas.
  7. In a separate bowl combine flour, baking powder, bicarb soda, and cinnamon
  8. Slowly add this to the zucchini and banana batter until just combined
  9. Fold in the choc chips
  10. Divided evenly in liners and bake for 15 minutes.

Drawing (1)

Continue reading

Cheesecake Brownies

If your sweet tooth is anything like mine you’ll love this recipe! It’s two of my favourite desserts in one.

DSC01937

The recipe not only tastes great but it’s cheap, quick and easy to make. Just follow my step by step instructions and before you know it you’ll have a delicious dessert to enjoy after dinner (or a sneaky snack during the day)

Happy Baking!!

Ingredients:

Cheesecake Mixture:

  • 1 packet Cream Cheese (room temperature)
  • 1/4 cup white sugar
  • 1 Egg
  • 1 cup White Chocolate Chips

Chocolate Brownie Mixture: 

  • 1/4 cup Butter
  • 1 cup Cooking Chocolate or Chocolate Chips
  • 1/2 cup white Sugar
  • 2 Eggs
  • 2/3 Plain Flour
  • 1/2 tsp Baking Powder
  • 1/4 tsp salt


Instructions 

  1. Preheat Oven 170c Fan Forced
  2. Line a baking pan with baking paper- I used a 12 x 7 inch. 9 x 9 inch will also work
  3. In a standard mixing bowl with the paddle attachment, combine cream cheese, 1/4 cup sugar and 1 egg.
  4. Beat until smooth and creamy
  5. Add 1 cup of white chocolate chips and set aside.
  6. Set up a Bain Marie on your stove top. Do this by filling a saucepan with water and setting a heatproof mixing bowl over the water- making sure the water doesn’t come into contact with the bowl. The water should be simmering.
  7. In the heatproof bowl combine the butter and the chocolate until well combined
  8. Turn off the gas/ heat to the bain marie
  9. Add 1/2 cup sugar and 2 eggs, stir to combine
  10. In a separate bowl combine flour, baking powder and salt.
  11. Add this to the chocolate mixture. Stir to combine.
  12. Pour half of the chocolate mixture into the prepared baking pan.
  13. Pour all of the cheesecake mixture on top of the chocolate mixture and spread to the edges
  14. Pour the remaining chocolate mixture onto the pan and spread. Swirl the mixture to give it a marble affect.
  15. Bake Cheesecake Brownies for 25 to 30 minutes. They’re cooked when the top is crinkled

Click here to see the ‘How to make Cheesecake Brownies” Video

DSC01944

Drawing (1)

Continue reading

Strawberry, Blueberry and Banana Bread: Whole Wheat and Gluten Free

Well and truly over Easter and the amount of chocolate you have just ingested? Me too!!

So why not give this Strawberry Blueberry and Banana Bread a go?

DSC00510 2

It’s nutritious, healthy, tastes great and makes you feel so much better after eating all that chocolate!

There is three options for you to try; plain flour, whole wheat flour or gluten free flour! So the recipe accommodates for all different individuals!

FYI: the bread tastes the best straight out of the oven when it’s still warm! YUMMY!!! (please let it cool so you don’t burn yourself)

Happy Baking!!

Ingredients:

  • 2 cups Flour; Whole Wheat Flour; Gluten Free Flour
  • 1 tsp Baking Powder
  • 1/2 tsp Bicarb soda
  • 1/4 tsp salt
  • 1 tbsp Unsalted Butter
  • 2 large Egg whites (70g)
  • 1 1/2 tsp Vanilla Extract
  • 3/4 cup Mashed Banana (2 medium bananas)
  • 1/4 cup Nonfat Greek Yogurt
  •  3 tbsp Honey
  • 1/4 cup Nonfat Milk
  • 1/2 cup diced Strawberries
  • 1/2 cup fresh Blueberries

Method

  1. Preheat oven to 180c (fan forced oven)
  2. Lightly grease a 9 x 5 inch loaf pan
  3. In a standard mixing bowl combine the sifted flour, baking powder, bicarb soda and salt. Set aside
  4. In a separate bowl whisk together the melted butter, egg whites and vanilla extract.
  5. To this add the mashed banana, Greek yogurt and honey
  6. Mix until well combined.
  7. Alternating between the Banana mixture and the milk, combine this to the flour mixture. Stirring until just combined each time
  8. Gently stir in the strawberries and blueberries  until just combined
  9. Pour batter into the prepared loaf tin and bake for 40 mins

Drawing (1)

Continue reading

Carrot Cake Recipe; Original and Gluten free

Hello all!

After watching my ‘How to Make Easter Chick Carrot Cake Cupcakes’ on YouTube (click link) I’ve decided to share my recipe for how to create these beautiful cakes for both original and gluten free options.

The cupcakes were beautiful and moist, I added a handful of sultana’s into mine to give them an extra bit of texture as well as flavour. The recipe is also super quick and easy so they can be made by absolutely anyone.

DSC00484

Original Ingredients:

  • 1 cup Flour (sifted)
  • 3/4 cup Corn Flour (sifted)
  • 2 tsp Baking Powder (sifted)
  • 1 tsp Bicarb Soda (sifted)
  • 2 tsp Mixed Spice (sifted)
  • 1 1/2 cups grated Carrot
  • 1 cup Brown Sugar (firmly packed)
  • 1 cup Walnuts (coarsely chopped)
  • 1/2 cup Olive Oil (I used light)
  • 1/2 cup sour cream (I used light)
  • 3 Eggs

Gluten Free Ingredients:

  • 1 cup soy or chickpea flour (sifted)
  • 3/4 cup Corn Flour (sifted)
  • 2 tsp gluten free Baking Powder (sifted)
  • 1 tsp Bicarb Soda (sifted)
  • 2 tsp Mixed Spice (sifted)
  • 1 1/2 cups grated Carrot
  • 1 cup Brown Sugar (firmly packed)
  • 1 cup Walnuts (coarsely chopped)
  • 1/2 cup Olive Oil
  • 1/2 cup sour cream
  • 3 Eggs


Method:

  1. Preheat oven to 160c (fan forced oven) and line 16 cupcake liners (or grease and line the inside of a 6inch cake tin).
  2. In a large bowll combine the sifted flour, cornflour, baking powder, bicarb soda and mixed spice
  3. Using a spoon/ spatula mix dry ingredients until combined
  4. Add the grated carrots, brown sugar and walnuts.
  5. Mix until combined
  6. Combine the oil, sour cream and eggs in a jug and whisk well to combine.
  7. Add to the dry ingredients and mix to combine.
  8. **Optional** add a handful of sultanas. Mix to combine.
  9. Scoop the cupcake batter into each liner filling it 3/4 of the way (or pour mixture into the prepared cake tin)
  10. Bake for 18-20 minutes. (if cooking the cake cook for 40-45 minutes)

DSC00466

Decorating the CupCakes

I made my Cupcakes for Easter so I gave them a cute little Chicken Cupcake topper made out of fondant with  ‘Buttercream‘ icing – the recipe can be found in one of my previous blogs or by pressing the link.

Drawing (1)

Continue reading

My Floral Cake for the Cake Expo 2016

Hello everyone!

What an exciting weekend it has been!

The Cake Expo has come to an end and I thought I would share my experience with how my cake came to be (similar to my previous blog about my Gnome cake for the Cake Bake and Sweet show)

IMG_4544

So for the Cake Expo I had the choice of entering the One Tier, Two Tier, Three plus Tier, Novelty Cake or Cup Cake tower Category. Seeing as I did Novelty for my Gnome cake I thought I would give the One Tier Category a try.

So brainstorming time. I wanted something colourful yet simple, so I thought nothing would be better than to make a one tiered cake with some beautiful flowers on top of the cake. Also after participating in many flower making classes using fondant I thought I would be able to master my technique and produce and amazing looking cake.

The two weeks leading up to the cake expo was a nightmare! Almost every day was in the high 20 or 30s and every cake decorator knows that fondant melts in the hot weather and that it is extremely difficult to work with! However with the A/C on high and a fan going I managed to endure!

DSC00374

Without revealing to many of my cake decorating secrets with this post, this is what my work station (aka mum’s kitchen table) looked like every night. It was crazy hot!

The pictures above are just a few snap shots of myself making my petals for the sugar flower and assembling my rose petals. All these components dried for 3-4 days before I assembled them (when the weather is not so hot usually 2-3 days)

In the days that I was waiting for all my flowers to dry I assembled my cake. Again my cake wasn’t a real cake. It was just a poly 8 inch covered in foil and then covered in fondant twice to make it beautiful and smooth.

DSC00408

I also made some different shaped leaves that I added in-between my flower arrangement on my cake. I let these dry for just 1 day just incase I needed to move or change their shape.

DSC00464

The final result. Absolutely beautiful!

IMG_4565

To view a 360 degree on my cake please visit my YouTube Channel Bindi’s Cake Decorating YouTube Channel or click the link below

Thanks for the opportunity to participate in the Cake Expo!

Drawing (1)

Continue reading